
10 Adobe Illustrator Tools Every Designer Should Know About
10 Adobe Illustrator Tools Every Designer Should Know About
Any graphic designer knows that Adobe Illustrator is one of the best vector graphics editors out there.
At first, beginners complain that working with the program is not very convenient, but its full power is revealed later, when the designer begins to understand how everything works. With the help of Adobe Illustrator, you can implement almost any graphic idea and that is why millions of designers around the world use it today.
One of the reasons explaining the incredible demand for Illustrator is its functionality, the program has many wonderful tools that make your work much easier. Some of them are very simple, others will be a little more difficult to master, but no successful designer or illustrator can do without knowing the specifics of their work.
It doesn’t matter what exactly needs to be created using Adobe Illustrator – you can’t do without tools. They save the user from routine work and significantly save time. For example, if you need to create some kind of effect in an illustration, you can do it like this: start from the very beginning and achieve the desired result by performing, say, 100 actions. But if you know exactly how this or that tool works, you can create the same effect by clicking the mouse a couple of times.
However, in this article, we will not consider the different techniques and tricks that allow you to achieve amazing effects. Here are 10 Adobe Illustrator tools every designer should know about.
RULER
The ruler is a very simple, but at the same time very useful tool if you require precise adherence to dimensions when working on a project. Guides allow you to accurately position objects inside the workers, control their dimensions, they can be used to create graphical grids of any complexity. Ruler is one of the first tools an aspiring designer should become familiar with.

By default, rulers are not displayed in Illustrator. To make them visible, you need to press the keyboard shortcut Ctrl +Ror by finding them in the menu View>Rulers>Show Rulers(Show rulers). Two rulers will appear: top and left.

Then everything is simple: the guides are drawn with the mouse with the left button pressed: click on the desired ruler and drag. Likewise, already created guides can be moved within the work area.
A ruler is a must if you want to achieve balance in your composition. In addition, they significantly speed up the workflow, as they allow you to accurately position objects relative to each other.
BLEND TOOL
Blend Tool is one of the most obscure and underestimated tools, many designers only after a long time begin to understand its versatility. Blend Tool seems complicated and it is not entirely clear in what cases it can be used to speed up work.
Like many other Illustrator tools, the Blend Tool can be used for a wide variety of tasks. It can be used to create complex patterns and textures, or, as the name of the tool suggests, to make smooth color transitions between two objects.

The Blend Tool is located in the toolbar, it can also be called from the menu Object>Blend… In the dialog box that opens, you can set the necessary transition parameters. This is a very handy tool that must be present in any designer’s arsenal.
OFFSET PATH
It is often necessary to create an enlarged copy of an existing object or increase the size of the object’s outline. There are several ways to do this, and beginners often use the most obvious ways, making a lot of unnecessary movements. Meanwhile, Illustrator has a very useful tool called Offset Path, that is, a parallel path.
As the name suggests, Offset Path creates an enlarged copy of the selected object directly below it. The new shape is identical in shape and color to the original, only the size is different.
 Using parallel paths, you can create concentric circles, simulate an increase in the size of the path, while all objects do not move relative to each other. The Offset Tool will be very useful when working on icons or when creating infographics.
You can find a tool in the section Object>Path… In this case, the object must be selected, otherwise the dialog box for changing the parameters of the parallel path will not appear.
THE CLIPPING MASK
Tool Clipping Mask novice designers are often undeservedly overlooked. But enough to get to know him better, it becomes clear that it is a great helper for creating a variety of shapes and effects.
What is a Clipping Mask? It is an object that masks unwanted areas of another object, so that the result is that what lies within the clipping path is visible. The most obvious use of the Clipping Mask is to crop images, but with enough skill this tool can create the shapes you want very quickly.
 Typically, when creating complex compositions where you need to reshape objects, the Pathfinder panel and its Shape modes are often the best choice. But sometimes the use of clipping masks is justified, since they are easier to work with, while the user still has the ability to edit the masked objects.
The Clipping Mask tool is also in the menu section Object…
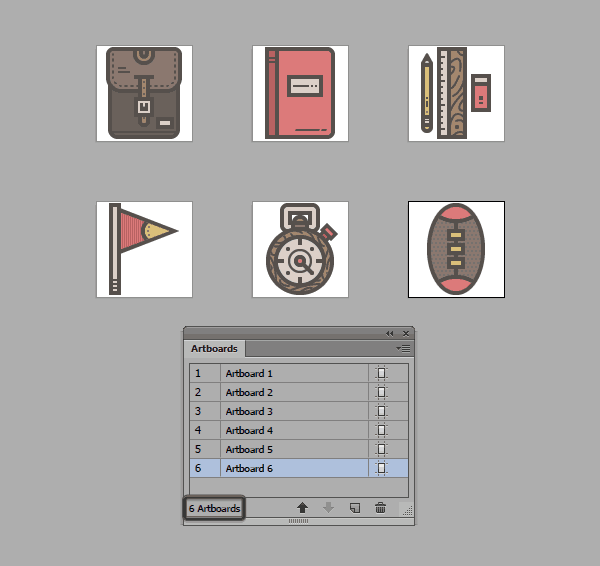
ARTBOARDS PANEL
In print design, very often the same graphic elements are used within different media. If you need, for example, to place a logo and corporate identity elements on a brochure, banner and business card and do this without creating three new documents, then using Artboards, that is, artboards, will help here.
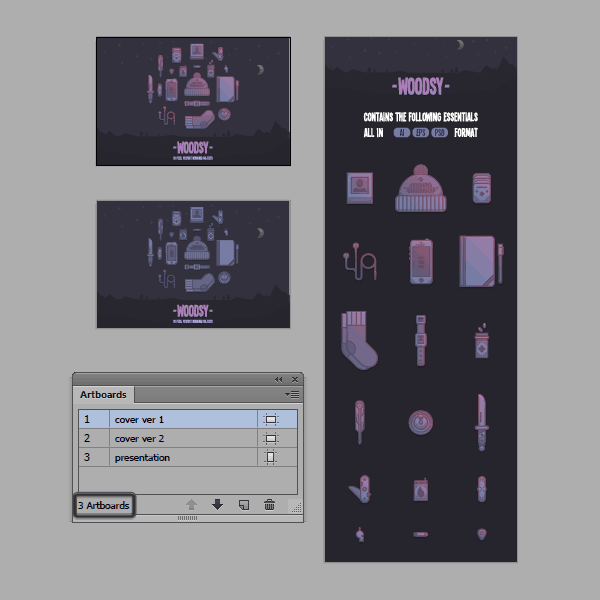
Using multiple artboards saves a lot of designer time. All the necessary elements and composition options are right in front of him, in Artboards Panel, so it will take a split second to access the desired artboard.
Artboards Panel also dramatically speeds up the process of exporting, printing, and saving artboards. When working on complex projects, such as large icon packs that need to be saved in different sizes and formats, using the Artboard Panel tool can save you a lot of time.
LAYERS PANEL
If artboards allow you to create a single document with multiple assets, then Layers Panel makes it possible to create detailed compositions using a logical structure that allows you to easily identify and customize individual parts of the same composition without worrying about losing or erasing any element.
Use the Layers Panel if you want to create a detailed hierarchy in your document. Any complex design consists of several parts, there are basic sections, there are intermediate and final ones. By placing parts of the composition on separate layers, you can work smoothly until it is finished.
 In the Layers panel, you can lock, hide, rename and move any layer, giving the user an idea and understanding of what he is creating. This way, the designer can focus on one thing and try to improve the composition. Other design options may be hidden at this time, and after making the final decision, unnecessary layers can be removed.
PATHFINDER PANEL
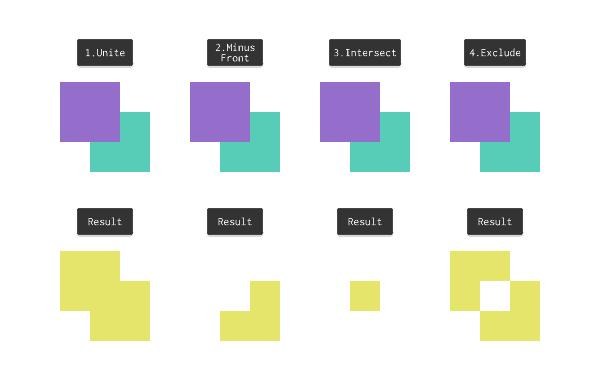
Four modes can be found in the Pathfinder panel Shape Mode, with which you can create new shapes by merging, intersecting, or excluding objects. With sufficient skill, the use of any mode allows you to very quickly create an object of the desired size and shape. As mentioned, there is a lot you can do in Illustrator with the tool Clipping Mask,Clipping masks are very effective in the right hands. But if you need to create a completely new shape, then this can be easily done in the Pathfinder panel.
 The user has access to modes Unite, Subtract, Intersect and Exclude,with which you can create new interesting shapes. Over time, the designer chooses the most convenient mode for himself, which he uses in the future.
ALIGN PANEL
If you need to align objects in the artboard or distribute several shapes at a certain distance from each other, then the panel Align (Alignment) is the best tool for solving problems of this kind.
The Align panel should be used in cases where you need to bring several objects to a single state, for example, align them along the left line, top or bottom. It is enough to select the necessary shapes and click on the desired icon.
 By default, several panel options are hidden, to make them visible, you need to click the little arrow and enable Show Options… As a result, additional functionality will appear Distribute Spacing, with the help of which it will be possible to accurately position two or more objects at a given distance from each other.
GRID
To understand how the tool works Grid you must first display this grid. To do this, go to the menu section View and find the item Show Grid…
Why is this tool so important. Any designer knows that all elements of the layout should be at a certain distance from each other. The easiest way to arrange them is based on the grid. The grid makes it easier to position elements and tells you how to properly structure all parts of the layout.

This is a very useful tool for those designers who create pixel-precise layouts. Grid will also be appreciated by web and interface designers. The tool is very powerful and there is no way in this article to describe how you can use it in your work. More information about the Grid tool can be found here.
SNAP TO GRID / PIXEL GRID
The grid itself is a powerful tool, but as soon as you need to create a layout where objects need to be positioned with pixel precision, beginners can get into trouble. However, Illustrator has a solution to this problem: Snap to Grid / Pixel Grid(Snap to grid / pixel grid).
In different projects, you will have to adjust the grids depending on what exactly needs to be done, while the size of the canvas and the principles of placing elements in the layout matter. For simple compositions, you can use the standard grid, but when perfect accuracy is required, it is better to set the lowest possible settings: grid line every one pixel, division within the grid step: 1.

Through the use Snap to Grid / Pixel Grid you can create incredibly clear images that look very professional. This is not unusual, since all objects are tied to the pixel grid and, importantly, they were all created, initially having predetermined dimensions in pixels.
Source: freelance.today
…

