
Working with text in Photoshop: 10 effective techniques
Working with text in Photoshop: 10 effective techniques
The possibilities for working with texts in Photoshop are growing with each version, new actions are easier and easier to perform, but despite this, many designers continue to go around by taking unnecessary steps: traveling through the menu instead of using hotkeys, manually changing parameters for numerous text layers instead of using paragraph styles and so on.
In this article, I want to offer you 10 simple techniques that will help you work with text more efficiently.
Correct text anti-aliasing
A few months ago, Adobe added several native text anti-aliasing methods to the new version of the program, which are available depending on the OS on which Photoshop is running – Mac or Windows (in versions with and without subpixel anti-aliasing). Finally, the text in the layout looks the same as it does in the browser.

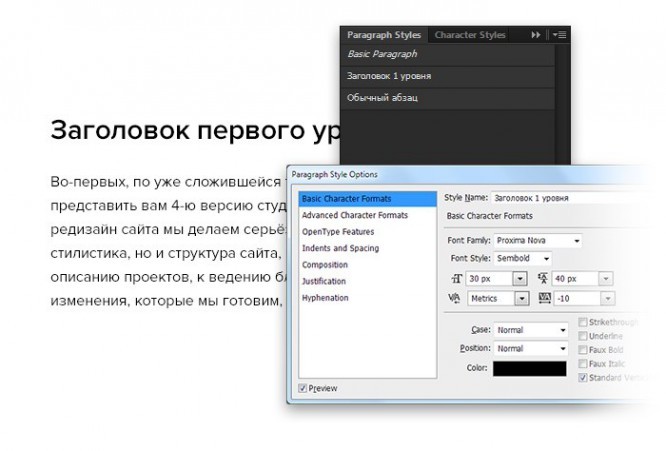
Paragraph Styles and Character Styles
A feature that is missing in any layout where more than one text block styling is present. It is enough to create the required number of text styles and change them only once in the styles panel, and the program will do the rest for you.
Inking text inside shapes, or writing text along a path
Sometimes it becomes necessary to give a text block not a simple rectangular shape, but with an uneven edge so that the text flows around some object.
In this case, create a shape and click inside it with the Type Tool (T) selected. After that, a separate path will be created for the text layer, which you can edit at any time.
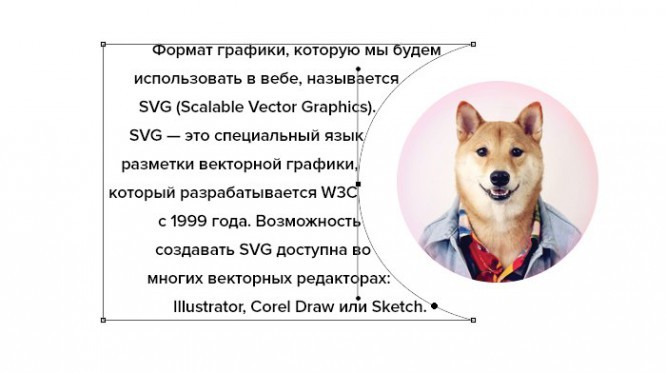
Naturally, you can also create a vector path of any complexity and add text to it – by the same click with the Type Tool turned on.
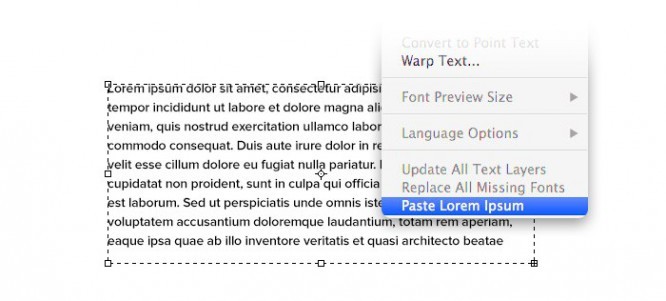
Automatic fish text
While I don’t recommend using a Lorem Ipsum-style abstraction as a fish for layouts, sometimes you need to insert a small amount of text in order to estimate the layout or size of a text box. With the Paste Lorem Ipsum function, this takes a few seconds. Naturally, without the Cyrillic alphabet (although the craftsmen offer a way of Russification).
Applying Postcard and 3D Extrusion to Text
Combine Photoshop is rich, among other things, also some functions for working with 3D. Using Postcard or 3D Extrusion effects on text will allow you to move, zoom in, zoom out and rotate your text layer in 3D space.

Converting inline text to block text and vice versa
Sometimes you want to set the width of a text layer that we created earlier with a simple click. Often, we simply arrange line breaks with the Enter key, adjusting the text to the desired width.
The correct way out is to use the Convert to Paragraph Text command, in which the width of the text block is set by the frame. The operation works in two directions – we can turn block text into line text with the Convert to Point Text command.
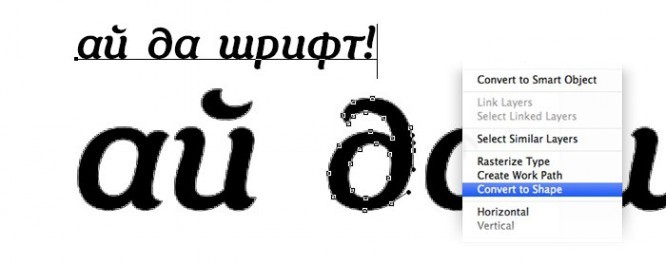
Convert to shape
If you want to make changes to some letters, for example, in an advertising slogan and do not want to lose quality during the subsequent resizing of the text – just turn this text layer into a shape and edit it using the Direct Selection Tool or the Path Selection Tool. Protected by a vector.
Using Smart Objects to retain the ability to edit text and apply filters or warps
One of the most convenient ways to experiment with text, without losing the ability to change the content at any time, is to turn it into a Smart Object. Free Transform will remember the points to which you dragged the vertices during distortion, and all applied filters will remain editable!
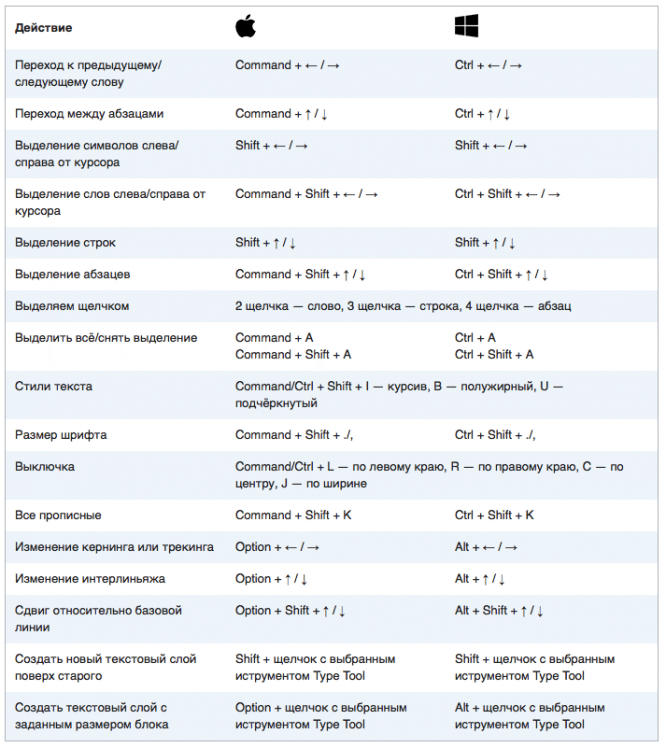
Hotkeys for very fast work with text.
Copying CSS text layers
One of the new functions in Photoshop allows you to copy a set of CSS properties of essentially any layer or group (when using the command on a group, the properties of both the group itself and the layers inside it will be copied).
Applying this function to a text layer will allow us in a few seconds to get useful information for layout, such as the font used, its size, color, leading and justification.

Once again, we have slightly improved the knowledge of our main tool and improved the workflow. It’s time to close the article and move on to practice, not forgetting to use our tips! Well, if you have any questions, do not hesitate to leave them in the comments!
Source: popel-studio
…
