
Using Sketch.app for print design
Using Sketch.app for print design
Translation of the article “Sketch for print design”, in which Peter Nowell shares his experience of using Sketch to create print designs.
Sketch was never intended for print design, but I’ve used it for a lot of projects. Here’s how.
Sketch was created for screen design.
Websites, applications, icons… these objects exist in the world of pixel measurements, RGB palettes and are presented on digital displays. Unlike many Adobe tools with 10,000 features, Sketch is clearly focused on its primary purpose and therefore performs better and more efficiently.
Sketch was not created for print design.
Business cards, brochures, posters … they exist in the real world, measured in inches / millimeters / points, in CMYK or Pantone color scheme and appear on physical materials. Adobe Illustrator and InDesign are some of the most popular tools in the field.
But if you are like me, then you will be much more effective in Sketch. And while doing a print design project, you may find yourself tempted to use the same tool that you used for your web design. This is doable. This is how I do it.
The magic number 72
For print settings, the primary units of measure are points (1 point – 1/72 “) and peaks (1 peak – 1/12”).
The size of the font is measured in points: 12, 18, 24, 36 and 72. These numbers should be familiar to you – these are the standard digital font sizes for Macintosh. The first Mac computers used screens where every centimeter contained 72 pixels, resulting in 12-point text being the same size on screen as in print.
This article uses the inches measurements that are used in the printing industry in the United States.
Sketch measures everything in pixels, so we need to have a way to translate our work into inches. By now, you’ve probably guessed how it works: 72 pixels in Sketch are converted to 1 inch when exported to PDF. So an 8.5 “x 2” sheet of paper equals a 612 pixels by 792 pixels artboard.
When you add a new artboard, Sketch offers you several Paper Sizes presets. You can customize them for yourself, speeding up your work in this way.
Tips for designing your own template
Try to use sizes that easily convert to inches. For example, 1 pixel = 1 point for lines.
You can use the grid function to make measurements easier. I suggest a grid with a block size of 9 pixels and thick lines every eight blocks (to represent one inch).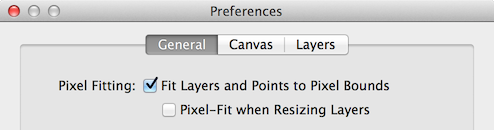
You can turn off “Pixel Fitting” in the settings. In print design, you don’t need to align pixels the way you would in a design for a screen.
Margins and bleed
Professional printers often require extra space on all sides of a document — bleed or bleed. My typography requires a 1/8 ” bleed and I add it in my Sketch layout (9 extra pixels per side).
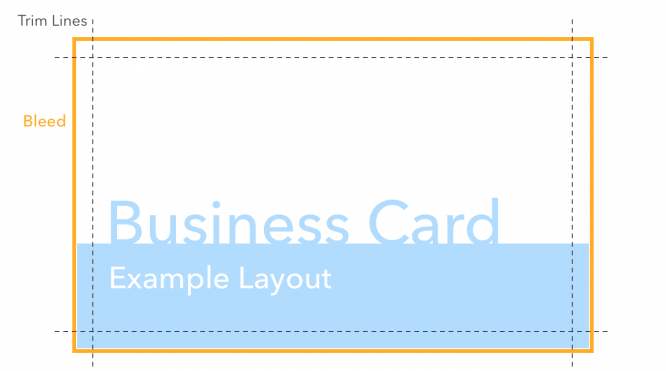
If your layout contains out-of-margin elements, I suggest doing the same – if not, you can easily add those extra fields when saving to PDF. Typographers also recommend that you leave a 1/8-inch margin between text and cut lines – the “safe zone”. This area shows how the final work will look like. Since trimming is rarely 100% accurate, some design details that extend to the very edge of the bleed should be extended beyond it.
Preparing a file for printing
99% of printers have strict job requirements. The following process will help you give them the files they want! If your layout relies heavily on images, gradients, or shadows, then skip straight to the next section.
When you’re done with your layout in Sketch, export it to PDF at 1 pixel scale. Many programs such as Illustrator will automatically interpret a 72 ppi file. You can see the dimensions of the PDF in inches in the preview window (Tools> Show Inspector, ⌘I), or in pixels using Get Info (under “More Info”). If you save the PDF through Illustrator, the pixel and inch dimensions are automatically included in the file.
There are a few more things to work with:
The text should be converted to curves.
Colors must be converted to CMYK.
Any images must be converted to CMYK.
Convert text to curves
In order for the layout to look the same in print as on a computer screen, you need to convert the text to vector shapes. Thanks to this, the text is not distorted in other programs and on other people’s computers, regardless of whether the fonts used are installed there.
It is possible to convert text to curves in Sketch, but if your work contains a lot of text, the program will be very slow. A proven way to crash Sketch is to select dozens of text objects and try to convert them to curves all at once. Fortunately, Illustrator does a much better job at this, so it will be easier to use.
Open PDF in Illustrator and select all objects. Next: Type> Convert Text to Outlines (⌘⇧O). That’s all.
Converting to CMYK
After opening the PDF in Illustrator, go to File> Document Color Mode> CMYK Color. This converts the entire document from RGB to CMYK. Now we need to change the colors to the actual CMYK values.
If you are used to the rich colors of screen design, then it must be said that CMYK will most likely disappoint you. Due to the nature of the combination of the four primary colors (cyan, magenta, yellow and black), many colors are difficult or simply impossible to recreate. Without diving into color theory and weighing all the pros and cons, I can offer you a decent alternative. Buy a Pantone catalog (expensive, but it will pay off, believe me) and find a close enough one for each color you use.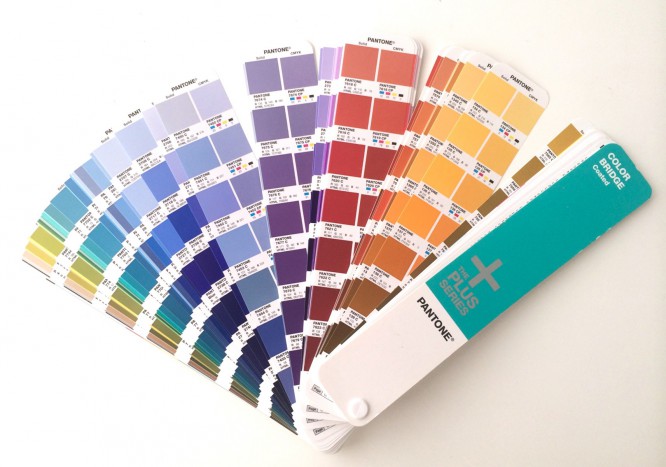
After you select the appropriate colors in the CMYK system, you need to replace the existing colors with them. It sounds boring (to some extent it is), but I have a few tips that can make things easier.
First, you will need to select the elements that you want to change the colors of. If you are not familiar with Illustrator, be aware that the layer is only selected by clicking on the small circle to the right of it.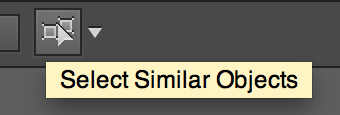
If your work contains many elements of the same color (say, green text), you can select them all at once by first selecting one element and then clicking the “Select Similar Objects” button on the right side of the toolbar. If the button is grayed out, try the Select> Same menu.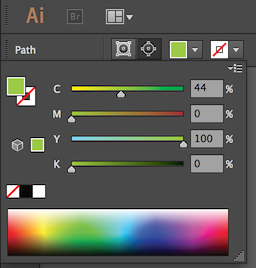
With your items selected, press and hold the Shift key while clicking on the fill color in the toolbar. Even pure black elements must be converted to black in CMYK.
Last step!
With all the text converted to curves and all colors converted to CMYK, it’s time to save a separate PDF. Saving is done via the File> Save As menu. That being said, you have a trillion save options. The only thing I have ever used is the addition of a bleed release.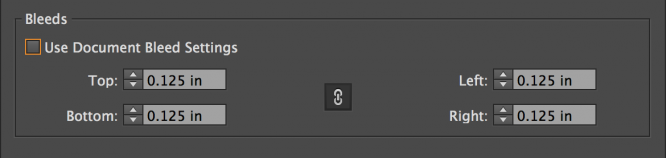
Everything is ready! Believe me, next time this whole process will take half the time!
Is your design heavy?
If your Sketch project includes bitmaps, they will automatically be converted from RGB to CMYK when you change the mode of a color document. After importing to PDF, any shadows will turn into bitmaps, gradients will also become non-editable. Therefore, if shadows and gradients are important to your work, I highly recommend saving the entire layout as PNG and converting it to CMYK in Photoshop following the tips below.
Export from Sketch to PNG at 4.166x, which will give you the number of pixels you need to print at 300 ppi. Typography rarely accepts bitmaps with a resolution lower than this. Make sure the exported file contains a bleed (described above).
Open the PNG in Photoshop and go to Image> Image Size. Deselect the Resample checkbox and enter the dimensions in inches or ppi that was used when exporting from Sketch. Click OK.
On the menu bar, go to Image> Mode> CMYK Color. A warning appears that the program is converting the file to the default CMYK color profile. This step can dramatically change the color of your work.
You can customize the color if you like. Save the file as .psd or .tif.
You can of course use this process in conjunction with PDF + Illustrator by exporting from Photoshop to Illustrator. Personally, I use either one or the other.
Is this process right for you?
If you are good at Sketch, or not very familiar with Illustrator / InDesign, if you have projects in Sketch that you want to see in print, then this way of working is for you.
Translated by: Vasily Fedotovsky
Source: Medium
…

