7 Tips for Sketching and Visual Notes
7 Tips for Sketching and Visual Notes
Sketches are rich visual notes that combine handwritten text, graphics, typography, shapes, and visuals such as arrows, windows, and lines.
Sketches can also be referred to as Notes Plus because they are similar to common notes, but enhanced with visual elements to emphasize ideas.
Sketches are great for quick note-taking of lectures, for brainstorming sessions, for presenting information to other people, and for many other purposes. In this article, we will provide some tips for using this technique.
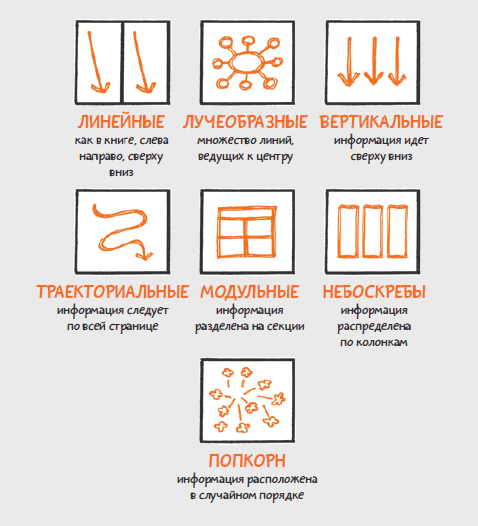
First, the basis of the sketch has nothing to do with art – the structure is most important. Here are seven of the most common visual note patterns:

Second, make sure your sketches are fast, free, and even a little crazy. Light insanity very often leads to great ideas.
Third, build a library of icons that you use frequently. Create a list of ideas that you would like to turn into icons, and then create icons in your spare time. Borrow icons for your library from other people.
How do I create an idea map sketch?
To create your idea map sketches, there are seven steps you can follow to create your own idea map, adapting it to your style and needs along the way.
1. Collect all your finds
Your information is your guide to processing and analysis. Printing out documents can give the process a substance, but a laptop or tablet will also suffice.
2. Select the surface for the map
You can create your map on a large poster, a piece of paper, a page in a sketchbook, a whiteboard, or even a drawing app on your iPad. Large surfaces are great for when you have a lot of ideas to map. Small ones will help you concentrate.
3. Start with a topic
If you have a main topic, first write it in large print for headings at the top (right, left, or center).
4. Place ideas on the map
Reread the research material for key ideas. Bring these ideas condensed to your map using text and graphics. Leave some space around the edges around each key piece so you can add new details as you go or after you finish.
5. Review and connect ideas
When you have processed the research materials for the first time, look at the map and try to find connections. Add new ideas to your map and use connectors and arrows to link ideas together. Added arrows between links.
6. Find and mark duplicate items
Look for recurring ideas as you revisit the resulting map. Mark them on a map or in a dedicated area using icons and comments.
7. Create a new map
If your idea map is sloppy and hard to read, that’s okay. Visual note cards are thinking tools. You can create a new map by revising and moving ideas: add, remove, move and change details as you work.
Source: 4brain
…


