
10 useful tips on how to overlay text on an image correctly
10 useful tips on how to overlay text on an image correctly
Depositphotos has a few tricks for you to enhance your visual stories with photography. Presentations? Banner ads? Presenting a lot of data on one slide? It couldn’t be easier with these recommendations.
A photograph paired with text is meant to tell a whole story, not just act as a backdrop. Therefore, working with an image is often more difficult than simply darkening or adding transparency. The key task is to combine the rhythmic pattern of the text and the graphic pattern of the photograph.
How to do it? On the web, you will find many examples and discussions of how to enhance the impact of text with photography. Below are the most interesting user tricks.
Text inscribed in the space of the photo
Use white space in the photo or stretch a free background to place the text there. Apply the balance rule: grouped dishes are balanced with the same number of text blocks.

Text as part of an image
The parts of the moped are used as the basis for placing the text. Thin and bright lines of letters pass into the outlines of objects. The lack of visual noise is ensured by focal points – black dashboard covers.

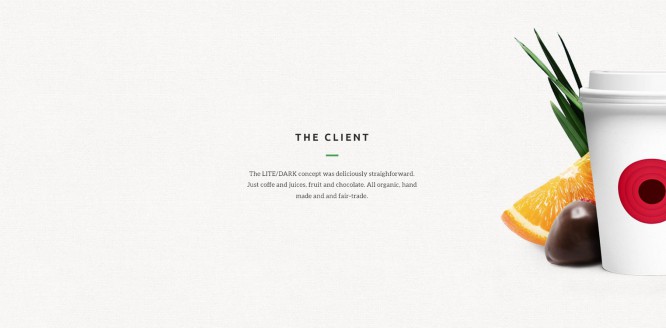
Text placed on a rectangle or other shape to improve readability
A photo full of vivid details still reveals its story, because the text is isolated by underlays. On the one hand, the image follows the rule of thirds. On the other hand, the emphasis is on the text thanks to the central placement. As a result, we get a complex but harmonious combination of visual languages.

Transparent text through which the background image is visible
White text on a black or green background can look rough. Make the text a little lighter so that the texture of objects in the image can show through the letters and thereby work to soften the graphical font.

Decrease photo brightness to highlight text
When you want to maximize the emphasis on the text, make the photo underneath lighter. This technique works well in cases where the image itself carries an easy-to-read idea.

Use minimal photography to create dramatic accents
Don’t be afraid of empty space and asymmetrical composition. Clean and light fonts in the center encourage the eye to move towards a bright accent on the periphery of the slide. Place something there that will strengthen your message.
Auxiliary elements for focusing attention on the text and separating it from the background photo
You can not just make the photo faint under the text, but enhance this technique with bold typeface and use of frames. The main thing is that the photo echoes the message that you want to convey to the reader.
“Parallax” of text and photography
One of the most controversial techniques due to its complexity. Remember that the human eye (in the Western tradition) tends to move along the slide from left to right, and also quickly grasps the brightest color accents on the plane.
Building a composition in such a way that its element is not only the text, but also the details of the photo
The background image offers different possibilities for experimenting with fonts. Rotate the letters at an angle to follow the placement vector, and use the free space to create the message you want.

The use of a contrasting font looks especially good in relation to the photo, while the text is inscribed in the image space.

The main thing in combining photography and text is simplicity.
Keep the rhythm connections as simple as possible, and remember that the easier the visual stories are to read, the better!
Source: lifehacker
…

