
How a designer can learn from someone else’s work correctly
How a designer can learn from someone else’s work correctly
When I do creative work like design or photography, I often refer to the book “Making music“… Earlier I wrote that this is a great guide for all creative people, not just musicians.
One of my favorite sections is Attribute directory… He addresses the age-old problem of how to draw inspiration from other people’s work without slipping into plagiarism. Here is an excerpt from the solution the book suggests.
Listen carefully – and many times – to what inspires you (“source”). Study it element by element and layer by layer until you can catalog its attributes. Once you think the directory is full, set aside the source and only reference the directory as a template for your own new work (“target”).
…
It’s clear from this quote that just scrolling through your social media feed isn’t enough for inspiration. It is necessary to carefully study the material.
I tried the above method, but many times I couldn’t figure out exactly what the individual elements and attributes are. I knew that the work I was looking at was good, but it was difficult to take it apart piece by piece.
I’m going to introduce you to the method I use to learn from other authors. Today I’ll focus on Instagram photography, but this method can be easily applied to other types of creativity, where the quality of work is the sum of many different subjective variables.
Three stages
This method consists of three steps:
- Accumulation
- Organization
- Analysis
These steps mimic the process of physically collecting photographs, placing them on the ground, grouping them according to similar qualities, and then analyzing the elements of each group.

In the physical world, this process can be tedious. Fortunately, we have digital tools that make this process easier, faster, and more flexible.
Stage 1 Accumulation
At this stage, you will need the following tools:
- Instagram account: This is needed because Instagram restricts viewing for unregistered users.
- Downloader for Instagram extension: with it we can easily download photos from Instagram.
- Figma: Since Figma is free and browser-compatible, it serves as a great base for projects like this.
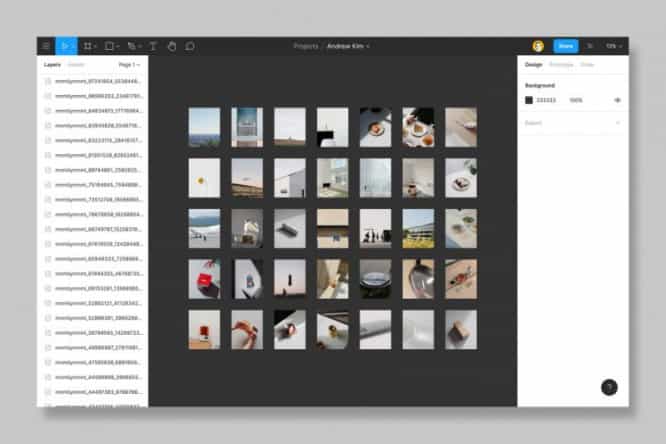
Take Andrew Kim’s photographs as an example. His Minimally Minimal website has been quite popular with design enthusiasts over the past decade, and his photographs are a decisive factor in that popularity.
We’ll start by using the Chrome extension Downloader to download our favorite photos from its Instagram page. After that, we can drag all the photos into a new Figma project.
Stage 2 Organization
The next step is to combine similar photos into groups, sorting them on the canvas. By holding alt, we can drag and drop duplicates if the photo is suitable for multiple groups.
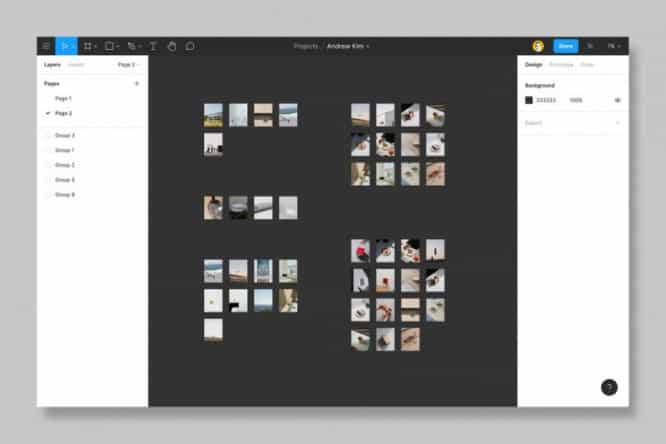
At this point, we can start doing a little analysis, but thinking too deeply can slow us down. We want to work as quickly as possible and should let our taste and creativity make all decisions. If two photos seem to be similar, we have to group them, even if at the moment we cannot figure out what exactly makes them similar.
As with any creative skill, the more we practice, the more we improve. Over time, we will be able to group similar photos more quickly.
Stage 3 Analysis
In the third step, we begin to learn from the source material. We need to look at each group of photos and determine which attributes stand out the most. We have selected several similar fragments and grouped them because it helps to bring out the characteristic features.
For example, one pattern that I noticed in Andrew’s work is how he composes a composition by selecting only one object. It tends to place this subject off the center of the frame and make it quite small, leaving a lot of space around it.
In another group of photos, I noticed the use of diagonal lines. When there is a line in the image, such as the edge of a table or the intersection of a floor and a wall, it places that line at an acute angle. This method produces an aesthetically pleasing image. It is also much easier to do than trying to align the line to the edge of the frame. You’ve probably heard how difficult it is to photograph the perfect horizontal or vertical line.
The last example from Andrew’s work is how he uses lighting. Many of his photographs feature long shadows that look like they are being cast by natural sunlight. They tell us that he takes these photographs as the sun approaches the horizon, probably at sunset. If you look at the colors, you will see that the shadows themselves are far from black, and the highlights are not pure white. From here we can guess that it most likely reduces the contrast of its images in post-processing. This technique allows you to combine highlights and shadows. Usually, if you are trying to expose shadows, then the highlights become too bright, and if you expose highlights, the shadows become too dark.
After analyzing the groups we have formed, we must make some analytical notes, analyzing the results obtained. However, before we go to the shooting, we must put our recordings aside.
By avoiding direct copying of the source material, we can embody the lessons we have learned and let our own creativity control the process.
Conclusion
As I mentioned earlier, this method is applicable to any kind of creativity where there is not an obvious subjective difference between good and great.
There is one point to keep in mind. Not all the knowledge gained can be applied in our work. Elements of a successful Instagram image cannot be applied to a large poster printed and hung on the wall.
Why learn from the work of others? Because everything in this world is a remix of ideas. As creators, we must learn from and give credit to those who came before us by transforming what we have learned into something new.
I hope this method helps you learn from those who inspire you.
Source: UXPUB
…

