

Consignment Store WordPress Plugin For WooCommerce
Are you looking for a WordPress plugin to help manage your consignment store? If so, then you’re in luck! We’ve got just the thing for you – our Consignment Store WordPress Plugin for WooCommerce. This plugin makes it easy for you to set up your consignment store, manage inventory, and track sales. Plus, it has all the features you need to make your consignment store run smoothly – from shipping to returns to payments. Give it a try today and see how it can help you take your business to the next level!
What is the Consignment Store WordPress Plugin?
The Consignment Store WordPress Plugin is a powerful plugin that let you easily manage your consignment store. With this plugin, you can create and manage your inventory, set up shipping, track orders, and much more. You can also add custom branding to your storefront. The Consignment Store WordPress Plugin is free to download and use.
How do I use the Consignment Store WordPress Plugin?
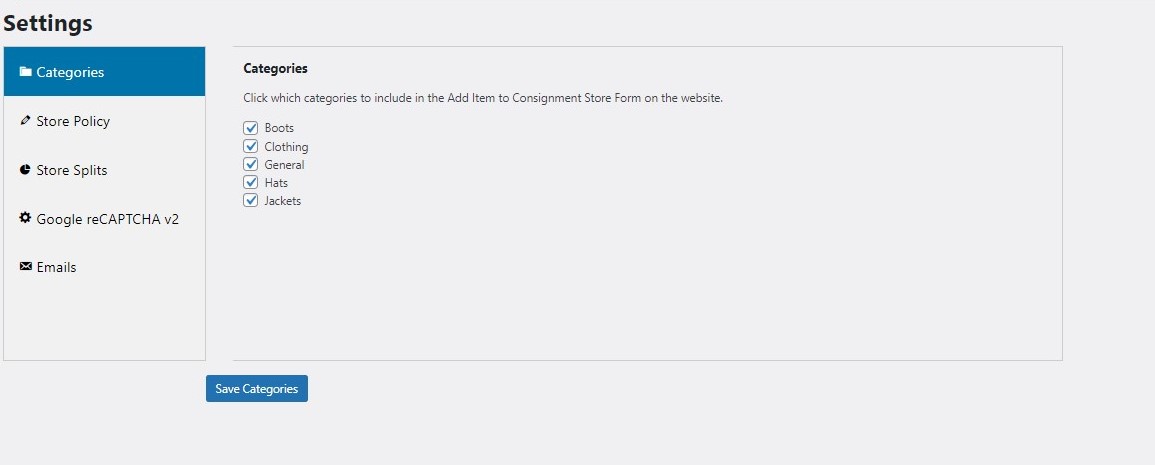
To use the Consignment Store WordPress Plugin, you first need to download it from the plugin repository. Once you have downloaded the plugin, you can install it by going to the WordPress Dashboard and selecting Plugins from the main menu. Next, you will need to activate the plugin by clicking on the Activate button. After activation, you will need to configure the plugin by clicking on the Settings button. In the Settings screen, you will first need to configure your store name and location.
Next, you will need to select your payment gateway. After payment gateway configuration is complete, you will need to enter your consignment store details. These include your store address and hours of operation. You will also need to enter your inventory list and shipping information.
Finally, you will need to enter your customer information. This includes your store’s contact information as well as customer ID and order number. Once all of your store settings are completed, click on the Save Changes button to save your changes. You can now open your consignment store online by going to http://your-store-address/.
What are some features of the Consignment Store WordPress Plugin?
The Consignment Store WordPress Plugin has a wide range of features that make it perfect for managing your consignment store. These features include inventory management, shipping, order tracking, and more. Some of the more notable features of the plugin include:
- Inventory management – The Consignment Store WordPress Plugin lets you easily manage your inventory list. This includes adding new items to your inventory list, deleting items from your inventory list, and viewing your inventory list in detail.
- Shipping – The Consignment Store WordPress Plugin also allows you to easily ship items to your customers. This includes setting up shipping rates, shipping methods, and more.
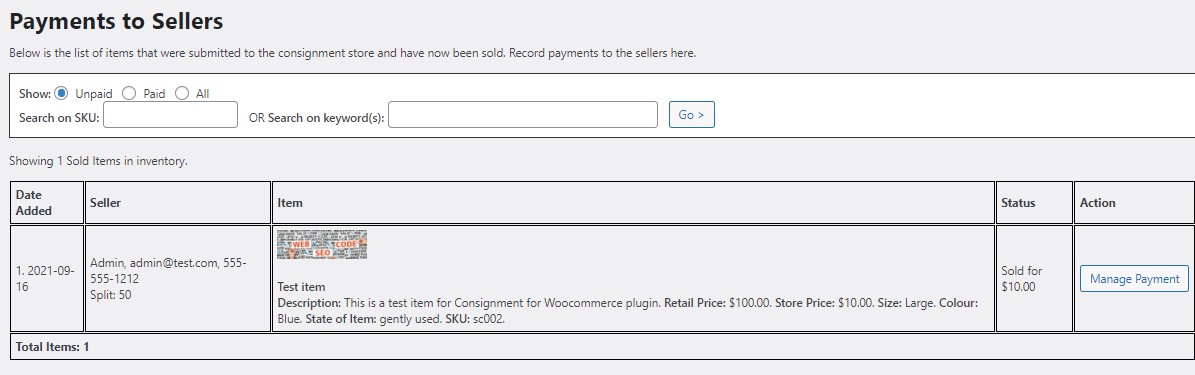
- Order tracking – The Consignment Store WordPress Plugin also allows you to track orders that are placed through your store. This includes tracking order status, order date, and more.
- Custom branding – The Consignment Store WordPress Plugin allows you to add custom branding to your storefront. This can include logos, colors, and more.
The Consignment Store WordPress Plugin is a versatile and powerful plugin that lets you easily manage your consignment store. If you are looking for a plugin that can help you streamline your consignment store operations, the Consignment Store WordPress Plugin is the perfect option for you.
How to install the Consignment Store WordPress Plugin?
If you’re looking to add a consignment store to your WordPress site, check out the Consignment Store WordPress Plugin. This plugin makes adding a consignment store simple and easy, with options for both online and offline stores.
To get started, create a new plugin in your WordPress dashboard. Under “Plugin Settings,” select “Consignment Store.” You’ll be given two options: an online store, or an offline store. For our example, we’ll be using the online option.
Next, under “Store Settings,” you’ll need to provide some basic information about your store. This includes the name of your store, the URL of your store (if it’s hosted on a website), and a contact form. You can also add products and pricing information here.
Once you’ve completed these settings, it’s time to add products! To do this, click on the “Products” tab and select the product type you want to use for your consignment items (textile items, jewelry, etc). Next, enter in the product title, price per item, quantity per item, and description of the product. You can also add images if you’d like.
Finally, you’ll need to add a shipping method for your consignments. The plugin has several options available (including Flat Rate Shipping), so feel free to choose what works best for your shop. Once everything is set up correctly, hit save and you’re ready to go!
How to use the Consignment Store WordPress Plugin?
With the Consignment Store WordPress Plugin, you can easily create and manage your own consignment store. The plugin includes a consignment shop page, an inventory page, and a checkout page. You can also add new products to your consignment shop, manage your orders, and more.
To get started with the Consignment Store WordPress Plugin, first install it on your WooCommerce website. Once installed, open the plugin admin area and click on the “Create New Shop” button. Enter a name for your shop and choose a location for your shop (you can either use an existing WooCommerce store or create a new one). Click on the “Next” button to continue.
Next, you’ll need to configure your shop’s settings. On the “General” tab, you’ll need to enter some basic information about your consignment shop (such as its name and logo). You can also specify whether you want shoppers to be able to place orders online or in person (you can choose between two different checkout pages).
On the “Products” tab, you’ll need to add all of the products that you want to sell through your consignment shop. Click on the “Add Product” button to begin adding products. You can add new products manually or using our product import tool (which automatically adds products from WooCommerce’s categories). Next, specify how much each product should cost (inclusive of shipping costs), how many items in stock each product should have, and when the product should be available for purchase (in days, weeks, or months).
Finally, on the “Orders” tab, you’ll need to add your shop’s orders management system. You can use our order form or an existing order management system (such as Shopify’s Order Processor). Next, specify how many orders you want to be able to accept per day, how long customers have to wait before they can place a new order, and how long it will take for your shop’s orders to be processed.
Now that you’ve configured your shop’s settings, you’re ready to start selling products through your consignment store! Click on the “Start Selling” button to open your shop’s checkout page. On this page, shoppers will be able to place orders online or in person. Once shoppers have placed their orders, you’ll need to process these orders and ship products out to them (you can do this using our shipping tools or using an existing shipping service).
Conclusion
If you’re looking to take your consignment store to the next level, then you’ll want to check out our WordPress plugin for WooCommerce. Our plugin makes it easy for you to set up and manage your consignment store from a single platform, so you can focus on running your business instead of spending time on tedious tasks. Plus, our plugin offers tons of features that will help you streamline your operations and make money faster. Don’t wait any longer – get started today with our Consignment Store WordPress Plugin for WooCommerce!

